Sunday, February 10, 2013

Harper is ONE! ONE IN A FLASH.

Like most mother's, I eagerly anticipated the birthday of my first and only child.
I wanted everything to be perfect!
So a few months beforehand I began researching ideas on Pinterest for her party.
I wanted something unique and not theme related to any characters, and in my search I found
"ONE IN A FLASH"!
It's original source was Elle Belle's Creations;
her party was over the top and had me excited to start planning.
 I also checked out a few other's who had used the same idea. Go check out The Macs aswell!
 Both of these mother's were able to create beautiful, affordable parties that, I believe, created lasting memories!

For Harper's invites I used Sassygfx on Etsy.
 It was $16.00 for the digital file.
I just e-mailed her the details of the party and a few photos of Harper that my cousin, Anna, and I took, she sent me a proof and had me approve, and then she sent me the final file for print.
From there I just went to my local Wal-Mart and had them printed!


 My favorite part of this whole party, was the basis of it centering around photos. 
I set a photo booth in my home salon using two flat, white sheets and a few items that added pops of color w/o taking away from the people in the photos: paper garland, a green chair, props, and balloons!

Check here for a tutorial on how to make the paper garland!


The sweet birthday girl!


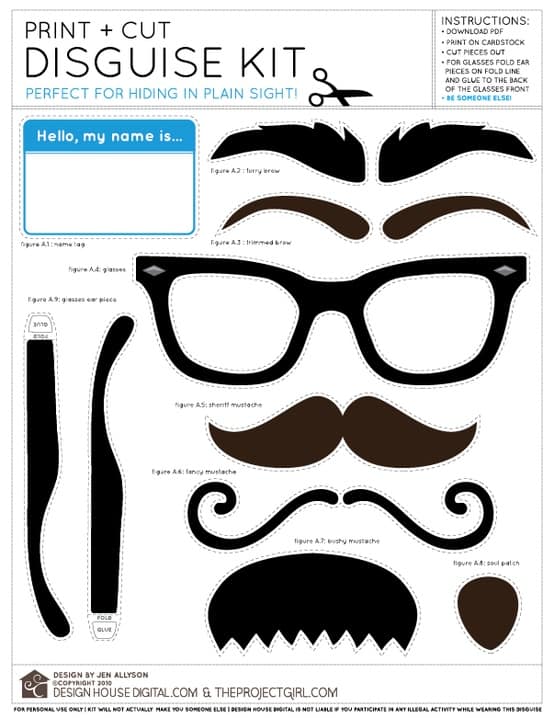
Here is the free printable that I used to create the photos props. 
I printed the originals and cut them out and then hot glued them to skewers sticks, making sure to glue over the pointed end. I then used the originals as templates to cut out more colorful replicas of the same items. I had one bucket of props here in the photo booth. 
I also created a second bucket of props to use as a centerpiece on the picnic table outside!


Everyone had a great time in here.
Excuse the picture overload. I tried to only use my favorites, but
we had so much fun!


After taking photos we went outside for cake and the hubby grilled hot dogs. 
Somehow in the hustle and bustle of the party, we forgot to photograph the food setup w/ the cupcake stand......tear! There was a lot of work put into them. 
Oh well....

I made a pendant banner out of scrapbook paper and printed the letters to Harper's name onto card stock as a topper for her cake. 
I simply used a glue stick to attach the two different papers. 
Then I used the glue stick to attach the pendants to the red/white baker's twine.


I tied the twine to wooden skewers to stick into Harper's smash cake.


 Harper feeding daddy!


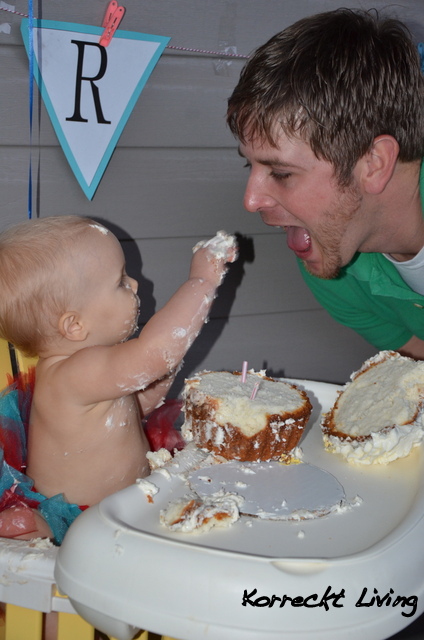
Sweet kisses for mommy!


SMASH!!!


Here are a few photos of Harper opening her gifts. 
I was pretty impressed with her attention span during this!! 
She received some great gifts!


We had a bounce house and the trampoline set up for the kids!


All of the kids received these glasses and bubbles, from Hobby Lobby, that were in little brown bags with the saying, "Thanks for making Harper's birthday Picture Perfect!" 


Harper loved the glasses minus the nose!
Can you tell that a certain little girl had partied too hard at this point? 


Thank you to everyone that made Harper's day extra special! 
And an EXTRA BIG THANK YOU to my cousin, Anna, for taking the photos and helping with the decorations.  
Also to my sister, Erica, for your support and for glueing all of the cupcake toppers together, that were not pictured!
 Lastly, to my awesome sister-in-law for baking the cupcakes and cake!

LOVE, 
THE KORRECKT'S

Monday, January 28, 2013

Before and After....THAT green set!!

I bought this set for $30 at a yardsale! I saw it and wasn't thrilled with the wood color or that lovely floral pattern, but the lines were beautiful! I knew that there was some promise after putting in a little elbow grease! 

Before:
 

AND After:

This was the usual furniture painting process. I removed the cushion and then sanded, primed, sanded, painted, dried, and painted again. I then decided that I wanted the grooves to stand out a little more and so I went back with a thin paint brush and white acrylic paint and painted the grooves!! I used a paper towel to smudge the acrylic paint a little. I didn't want a perfect look. It needed to look worn! For the fabric, I used good ole' drop cloth, $10 for a two pack! Can't beat it! 


 Here we used the chair as a prop for the photo booth at Harper's first birthday party. The color was great against the white sheet back drop!

Sweet Harper!


Happy Monday, Ya'll!
xoxo, Natalie


Tuesday, January 15, 2013

Cardboard Deer Head & Gratitude

 It is an honor to have someone trust you with their hair, and I've found that once a client becomes a "regular"you become family! I value that trust!! I also value that friendship! More times than not, client's are blessing me with gifts. That was the case when I was pregnant with Harper. 

Over Christmas I was overwhelmed with that same generosity! Tiny Phillips is a kindred spirit; she and I both love to craft. She is also a loyal client! Her last appointment she showed up with this little dear deer for me! I ADORE it! I can't tell you how many times I had thought of making several of these, and it meant so much more to me knowing that someone put in the time to bless me with such a gift. I am full of gratitude! 

Here he hangs! 

(look at the vintage buttons she used for eyes)

Here is a broader view, the shampoo corner. 
I also had a sweet client and friend of ours provide the plexiglass behind the sink. I was so stoked about that!!! You have NO idea how many times I have already touched the paint up there. So, this really warmed my heart. Thanks Terri Smith!

This little corner also had some new art to the chalkboard.

It's the same font as the logo. 


Thanks for stopping in,

Natalie


Wednesday, January 2, 2013

THE Red Door....glazing process.

I chose to name my business The Red Door Salon because with it being attached to my home, I needed a landmark to distinguish were customers should go. So, I knew when looking for a door that I was going to want to paint it. With that, why buy new? To Craigslist we searched and we found this Beauty; I'm pretty sure we paid about $125 for it. Not too shabby for an exterior door! 

Here are the steps for painting....
First, sand!! Just enough to rough it up. I used a palm sander with 125 fine grit paper.
2nd- Prime (not pictured). To make it simple I just used a can of primer spray paint to cut down on time! I had a well ventilated space. 
3rd-paint two to three coats of your chosen paint color. I don't have the name of the color I used on hand but if anyone is interested in the name, just let me know and I can provide it.  

After that has dried you start the fun part, the glazing!!

I've seen people use several different products for glazing. I wanted to go the cheapest route possible and therefore I found this MinWax Express color gel stain on sale for a dollar at Home Depot. Score!! I bought several tubes because of the price but I probably used less than a quarter of the tube. 
As seen, I used a fine painting brush so that I could easily get into any and all cracks desired. Just simply brush on and then with a paper towel wipe/smear off. It gives a worn, sort of, aged look!  


Lastly, seal with an outdoor PolyUrethane to protect from the weather! 


I loved the results so much that I decided to repeat the process on the interior of the door!

 I would love to link up with anyone else and their glazing victories!!

Thanks for stopping by,

Natalie


Monday, December 3, 2012

The Red Door Salon Part 2

Welcome to The Red Door Salon!

This sign was constructed by two old reclaimed post and then stained with a deck sealing stain to protect from the weather.
Here is an old piece of cedar that I repurposed. Tutorial to come later! I love that it looks like an old country store sign on my porch!
The stations are made from exterior doors that were pulled from a house that was about to be bulldozed. What a find, huh?!? There are shelves built in behind the doors for additional storage. I deplore clutter and wanted to be able to hide all of my salon products. These guys are so great that I want to do a post just on them!! 

The wall color is Rainwashed by Sherwin Williams.

Check out the tin ceiling! I chose this material because of the reflecting qualities. It is so important to have good lighting in a salon! Plus, I love the rustic feel that it brings to the space!


The round mirrors are from Hobby Lobby. The green set was a yard sale find that I recovered and painted. I get the most compliments on those. 
I painted the door myself and have promised many clients on a tutorial to come!

There is nothing superior about this shot and it has been changed a bit since this photo was taken. The room to the left is my color room and the room to the right is a half bath. 

Now that I've given a small tour, I'll be back soon with tutorials on the individual projects. Thank you for taking the time to see this space. I'd love any feedback!


Xoxo, Natalie

Saturday, November 24, 2012

The Red Door Salon!

Here's an exterior shot of the salon. I am more than pleased with the outcome! I have the greatest husband and father-in-law in the world! It's a small, intimate space that is allowing me to fulfill my dreams of working at what I love to do, hair, and allows me the affordability to raise my daughter. It's an exhausting feet juggling both, but I'm so blessed to have that option! Let me know what you think!
In Progress: We still need to add some landscaping.
Love: The Breezeway...aka my "long" drive to work!